How to Edit A Newborn Photo in Lightroom | Effective and Easy Tips
Tutorial by Sarah Borchgrevink | Professional Editing Software
Howdy, friends! Today's blog post shares some effective tips and tricks for editing a newborn session in Adobe Lightroom. First and foremost: please allow me to introduce myself! I'm Sarah! I'm a professional newborn photographer in Houston TX; I specialized in posed baby sessions within a studio environment. Because my sessions are affordable and have completely transparent pricing, I am often booked well in advance. I have around 20 new arrivals in my studio monthly, which means I've learned how to edit my sessions very quickly! The best way I have learned is through Lightroom. Let's get started!
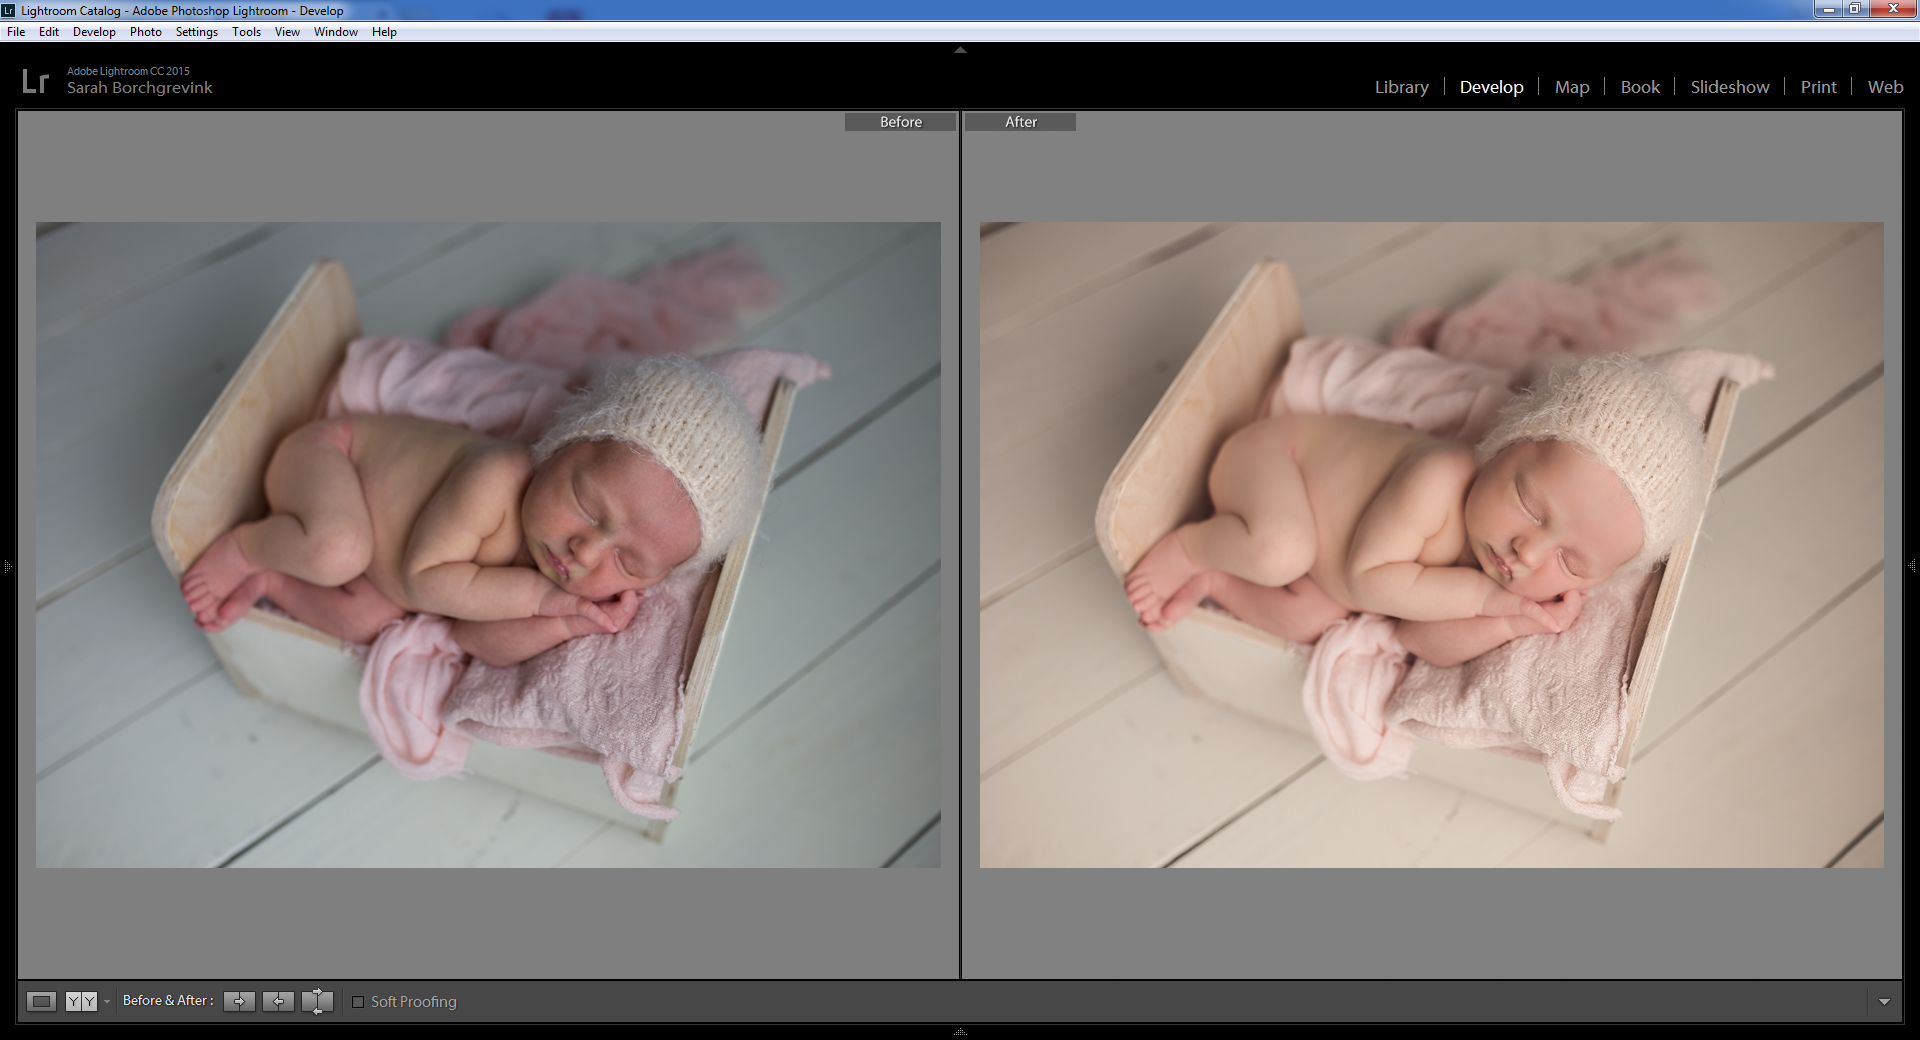
The sample photo I'm using today is of a sweet little girl named Layla. She visited my Houston Newborn Portrait Studio at 7 days old and her parents booked my 'petite' package, which includes those oh-so-adorable naked poses. This means all of her skin is exposed, so she's a great example for how to quickly streamline your editing when you have a ton of work on your desk!
Before & After | How to Achieve This Look
White Balance Adjustment
To foundation to an amazing newborn portrait is always having the perfect white balance. In my studio, I use professional lighting, and specifically use constant lights. You may be interested in this post sharing how I create a natural light look through studio lighting. I tend to prefer warmer white balances, such as 5300 degrees, or so. Whether you prefer warm or cool temperatures, make sure it is very consistent throughout the entire session. Don't jump around - it'll make the gallery lack cohesiveness. Here you will also look at the magenta and adjust as needed. I tend to prefer rosy images so I was a 50 on the magneta slider.
Creamy Skin Development | Reduce Red, Yellow, and Orange Skin Tones
To create those gorgeous creamy skin tones, I use my sliders in Lightroom. This is my next step after adjusting white balance. I will always start by removing the colors that are too strong in the images; for instance, newborn babies typically have a yellow, red, or orange undertone to their skin. The best place to begin would be by increasing luminescence, which gives baby that beautiful glow, reducing saturation, and adjusting hue. I placed a screenshot above. Of course, you are going to have different settings for different babies, but the sliders in Lightroom will give you full control of the babies skin as far as color.
Fun tip: you can create skin presets on your own without even having to pay for them.
Once you find the look you prefer in your own studio, developing presets will not only make your editing lightening fast, but will give you a very consistent look. Each gallery you send to parents should be very similar to the galleries earlier that week. This is part of your brand and being one of the Best Photographers in your area!
Smooth Skin
I do not do any skin smoothing in Photoshop for any of my newborn sessions. With the exception of the froggy pose, (check out a free step by step tutorial on how to safely pose a baby) all of my editing is done in Lightroom. After fixing white balance, adjusting baby's skin tone, and cropping my images, I will then skin smooth the baby. Babies can handle a reduction in clarity; I also will reduce the contrast a little bit, such as by -8, and will increase my highlights by +3, so baby still has beautiful contours and shadows to their face without the light look flat.
I will use the brush for this portion or (k) on a PC. Generally, the density is about 50-55, and I'll smooth different parts of the baby more than others. Their face, for example, always gets around 3 sets of brush strokes. Make sure you "erase" the brush on their lips, nose, and hands, however, so you do not lose detail.
Sharpen
After this, I sharpen the image last because I want to make sure it's not too sharp, but may also need more sharpening after the skin smoothing. This entire process takes me about 2 minutes/image, which means I can fully edit a newborn gallery in less than an hour. For sharpening, I prefer it to be around 70, with noise reduction at 12-15, depending on my ISO. Of course, these items will depend on what your own camera settings are. In my studio, my camera settings, according to my lights and how I like the images to look, are usually 1/160, f/2.2, and then ISO 320. I use a Sigma ART 35 mm f/1.4 and a Sigma ART 50 mm f/1.4. You'll also find a gorgeous 100 mm f/2.8L macro lens, which creates those super dreamy macro images, so sharpening of photos will always depend on your camera settings.
Thanks for stopping by my blog to read tips on how to edit newborn sessions in Lightroom!
Sarah Borchgrevink Photography is a Houston Newborn Photographer specializing in gorgeous posed newborn sessions. Her studio is located in Northwest Harris County. In addition to breathtaking baby portraiture, Sarah also offers stylish natural light family photography as well as dynamic outdoor maternity sessions for expecting mothers and couples. Sarah joyfully serves the entire Harris and Montgomery county areas including Houston, Cypress, Tomball, Spring, The Woodlands, Kingwood, Memorial & West Houston, Katy, Sugar Land, Pearland, Richmond, West University and Rice Village.


